NginxからBrotli配信するまでの設定手順 〜Ubuntu 22.04+Nginx 1.24.0〜

圧縮率が高いらしいBrotli
Hugo + Nginxで構築している当ウェブサイトのコンテンツ配信 (静的ファイル配信) を、従来からの非圧縮とGzip形式に加え、新しくBrotli形式でも行えるようにしたい。「Brotli」というのは比較的最近の圧縮形式で、予め辞書を持っているなどの工夫により、HTMLテキスト等の圧縮にめっぽう強いらしい。
参考までに、GzipとBrotliを用いて、当ウェブサイトのある時点での/index.htmlなどを圧縮した結果は次のようになる。Brotli [Best] は Gzip [Zopfli] よりも高い圧縮率を得られてファイルがよく縮む上に、圧縮と展開の処理にやたら時間がかかるという感じはしない。
| ファイル名 | 圧縮形式 [レベル] | サイズ (bytes) | 圧縮率 |
|---|---|---|---|
| /index.html | 非圧縮 | 55,201 | – |
| /index.html.gz | Gzip [Zopfli] | 9,112 | 16.5% |
| /index.html.br | Brotli [Best] | 7,943 | 14.4% |
| /index.xml | 非圧縮 | 248,649 | – |
| /index.xml.gz | Gzip [Zopfli] | 60,988 | 24.5% |
| /index.xml.br | Brotli [Best] | 51,417 | 20.7% |
| /css/style.css | 非圧縮 | 16,795 | – |
| /css/style.css.gz | Gzip [Zopfli] | 3,838 | 22.9% |
| /css/style.css.br | Brotli [Best] | 3,427 | 20.4% |
設定手順
今回設定するウェブサーバのPlatformとOSは次の通り。
| 項目 | 内容 |
|---|---|
| Platform | x86_64 |
| OS | Ubuntu Server 22.04.4 LTS (Jammy Jellyfish) |
Step-1. Nginxの最新安定版1.24.0をインストール
記事執筆時点でのUbuntu 22.04デフォルト状態におけるNginxのバージョンは「nginx 1.18.0-6ubuntu14」で、これは2020年4月にリリースされたもの。安定はしているだろうがやや古めに感じるので、今回はBrotli対応とともに次の方針で最新安定版でのNginx環境を整えることにする。
- Nginxの公式リポジトリからNginx本体のUbuntu用最新パッケージ「nginx 1.24.0」をインストールする
- 次に、Brotli対応に必要なNginxモジュールだけを別途buildする
この方針のメリットは、仮に [2] Brotli対応モジュールのbuildがどうしても成功しない場合でも、[1] Nginx安定最新版 (1.24.0) はパッケージインストールなのでほぼ確実に成功し、その利点は間違いなく享受できる点だ。一方でデメリットもあり、それは、Nginx本体のバージョンアップがなされた場合、そのバージョンに合わせてモジュールのbuildをおそらく再度行う必要があるだろう点だ。(その時の自分のためにこの記事を書くとも言える)
Step-1-1. パッケージでインストール
Nignx最新安定版のインストールを、下記のリンク先のどちらかのドキュメントにしたがって行う。運用の安定性を重視して、インストール時には「mainline nginx packages」ではなく、「stable nginx packages」を選択する (stableとmainlineの違いについてはこちら)。
- nginx: Linux packages > Ubuntu
- Installing NGINX Open Source | NGINX Documentation > Installing Prebuilt Ubuntu Packages > Installing a Prebuilt Ubuntu Package from the Official NGINX Repository
Step-1-2. バージョン確認
Nginxインストール後にバージョンを確認しておく。
$ nginx -v
nginx version: nginx/1.24.0
Step-2. Brotli対応moduleの準備
Step-2-1. ngx_brotliをcmake
Nginx 1.24.0に適用したBrotli対応モジュールをbuildする前段階として、次のリンク先の「Statically compiled」に記載されているコマンド群の上半分を実行する。なお、実行環境にはcmakeが必要だ。
具体的に、上記リンク先を引用しつつ、実行結果も織り交ぜると次のような流れとなる。
$ cd ~/tmp/
$ git clone --recurse-submodules -j8 https://github.com/google/ngx_brotli
$ cd ngx_brotli/deps/brotli
$ mkdir out && cd out
$ cmake -DCMAKE_BUILD_TYPE=Release -DBUILD_SHARED_LIBS=OFF -DCMAKE_C_FLAGS="-Ofast -m64 -march=native -mtune=native -flto -funroll-loops -ffunction-sections -fdata-sections -Wl,--gc-sections" -DCMAKE_CXX_FLAGS="-Ofast -m64 -march=native -mtune=native -flto -funroll-loops -ffunction-sections -fdata-sections -Wl,--gc-sections" -DCMAKE_INSTALL_PREFIX=./installed ..
(途中省略)
-- Build files have been written to: /home/mah/tmp/ngx_brotli/deps/brotli/out
$ cmake --build . --config Release --target brotlienc
(途中省略)
[ 24%] Linking C static library libbrotlicommon.a
[ 24%] Built target brotlicommon
(途中省略)
[100%] Linking C static library libbrotlienc.a
[100%] Built target brotlienc
$ cd ../../../..
Step-2-2. Nginxのconfigure argumentsを確認
Step-1でインストールしたNginxの「configure arguments」を確認しておく。当環境では1,500文字ほどの量になる。
$ nginx -V
nginx version: nginx/1.24.0
built by gcc 11.2.0 (Ubuntu 11.2.0-19ubuntu1)
built with OpenSSL 3.0.2 15 Mar 2022
TLS SNI support enabled
configure arguments: --prefix=/etc/nginx --sbin-path=/usr/sbin/nginx --modules-path=/usr/lib/nginx/modules --conf-path=/etc/nginx/nginx.conf --error-log-path=/var/log/nginx/error.log --http-log-path=/var/log/nginx/access.log --pid-path=/var/run/nginx.pid --lock-path=/var/run/nginx.lock --http-client-body-temp-path=/var/cache/nginx/client_temp --http-proxy-temp-path=/var/cache/nginx/proxy_temp --http-fastcgi-temp-path=/var/cache/nginx/fastcgi_temp --http-uwsgi-temp-path=/var/cache/nginx/uwsgi_temp --http-scgi-temp-path=/var/cache/nginx/scgi_temp --user=nginx --group=nginx --with-compat --with-file-aio --with-threads --with-http_addition_module --with-http_auth_request_module --with-http_dav_module --with-http_flv_module --with-http_gunzip_module --with-http_gzip_static_module --with-http_mp4_module --with-http_random_index_module --with-http_realip_module --with-http_secure_link_module --with-http_slice_module --with-http_ssl_module --with-http_stub_status_module --with-http_sub_module --with-http_v2_module --with-mail --with-mail_ssl_module --with-stream --with-stream_realip_module --with-stream_ssl_module --with-stream_ssl_preread_module --with-cc-opt='-g -O2 -ffile-prefix-map=/data/builder/debuild/nginx-1.24.0/debian/debuild-base/nginx-1.24.0=. -flto=auto -ffat-lto-objects -flto=auto -ffat-lto-objects -fstack-protector-strong -Wformat -Werror=format-security -Wp,-D_FORTIFY_SOURCE=2 -fPIC' --with-ld-opt='-Wl,-Bsymbolic-functions -flto=auto -ffat-lto-objects -flto=auto -Wl,-z,relro -Wl,-z,now -Wl,--as-needed -pie'
Step-2-3. Brotli対応moduleをmake
Nginx 1.24.0に適用したBrotli対応モジュールをbuildするために、Nginxのソースをダウンロードしたあと、次のリンク先の「Dynamically loaded」に記載されているコマンド群を実行する。
具体的には次のような流れになる。以下で実行する./configureの行には、上記Step-2-2nginx -Vの結果から確認できる、configure arguments:に続いている--prefix=...から始まるパラメータすべてを挿入しておくこと。
$ cd ~/tmp/
$ wget https://nginx.org/download/nginx-1.24.0.tar.gz # URLは https://nginx.org/en/download.html を適宜参照
$ tar xvzf nginx-1.24.0.tar.gz
$ cd nginx-1.24.0
$ ./configure 【Step-2.2で調べた「configure arguments」】 --with-compat --add-dynamic-module=../ngx_brotli
(途中省略)
./configure: error: the HTTP rewrite module requires the PCRE library.
You can either disable the module by using --without-http_rewrite_module
option, or install the PCRE library into the system, or build the PCRE library
statically from the source with nginx by using --with-pcre=<path> option.
↑「error: the HTTP rewrite module requires the PCRE library.」とのことなので、libpcre3-devをインストールしてから再度configure。
$ sudo apt install libpcre3-dev
$ ./configure 【Step-2.2で調べた「configure arguments」】 --with-compat --add-dynamic-module=../ngx_brotli
(途中省略)
./configure: error: SSL modules require the OpenSSL library.
You can either do not enable the modules, or install the OpenSSL library
into the system, or build the OpenSSL library statically from the source
with nginx by using --with-openssl=<path> option.
↑「error: SSL modules require the OpenSSL library.」とのことなので、llibssl-devをインストールしてから再度configure。
$ sudo apt install libssl-dev
$ ./configure 【Step-2.2で調べた「configure arguments」】 --with-compat --add-dynamic-module=../ngx_brotli
(途中省略)
./configure: error: the HTTP gzip module requires the zlib library.
You can either disable the module by using --without-http_gzip_module
option, or install the zlib library into the system, or build the zlib library
statically from the source with nginx by using --with-zlib=<path> option.
↑「error: the HTTP gzip module requires the zlib library.」とのことなので、zlib1g-devをインストールしてから再度configure。
$ sudo apt install zlib1g-dev
$ ./configure 【Step-2.2で調べた「configure arguments」】 --with-compat --add-dynamic-module=../ngx_brotli
(途中省略)
adding module in ../ngx_brotli
 + ngx_brotli was configured
checking for PCRE2 library ... not found
checking for PCRE library ... found
checking for PCRE JIT support ... found
checking for OpenSSL library ... found
checking for zlib library ... found
creating objs/Makefile

Configuration summary
  + using threads
  + using system PCRE library
  + using system OpenSSL library
  + using system zlib library

  nginx path prefix: "/etc/nginx"
  nginx binary file: "/usr/sbin/nginx"
  nginx modules path: "/usr/lib/nginx/modules"
  nginx configuration prefix: "/etc/nginx"
  nginx configuration file: "/etc/nginx/nginx.conf"
  nginx pid file: "/var/run/nginx.pid"
  nginx error log file: "/var/log/nginx/error.log"
  nginx http access log file: "/var/log/nginx/access.log"
  nginx http client request body temporary files: "/var/cache/nginx/client_temp"
  nginx http proxy temporary files: "/var/cache/nginx/proxy_temp"
  nginx http fastcgi temporary files: "/var/cache/nginx/fastcgi_temp"
  nginx http uwsgi temporary files: "/var/cache/nginx/uwsgi_temp"
  nginx http scgi temporary files: "/var/cache/nginx/scgi_temp"
↑ここまで行くとconfigure成功なので、moduleをmakeする。makeが成功するとmoduleが生成されていることが確認できる。
$ make modules
(途中省略)
make[1]: Leaving directory '/home/USER/tmp/nginx-1.24.0'
$ find . -name 'ngx_http_brotli_*_module.so'
./objs/ngx_http_brotli_static_module.so
./objs/ngx_http_brotli_filter_module.so
上記2ファイルのファイルサイズは、ngx_http_brotli_filter_module.soが約1.7MB、ngx_http_brotli_static_module.soが約77KBになるようだ。
Step-2-4. Brotli対応moduleを設置する
次のコマンドでBrotli対応moduleを/usr/lib/nginx/modules/へコピーする。
$ sudo cp ./objs/ngx_http_brotli_{filter,static}_module.so /usr/lib/nginx/modules/Step-3. Nginxの設定をBrotli対応に書き換える
NginxをBrotli対応に設定する部分は、各ウェブサーバの設定によって詳細が異なってくると思うので、ここでは詳細については言及せずにエッセンスだけ記載する。一次情報源としては GitHub - google/ngx_brotli: NGINX module for Brotli compression > Configuration directives を参照すること。
/etc/nginx/nginx.confのhttpブロックよりも上に、この2行を追加するload_module modules/ngx_http_brotli_filter_module.so; # for compressing responses on-the-fly load_module modules/ngx_http_brotli_static_module.so; # for serving pre-compressed files
/etc/nginx/sites-enabled/以下にあるウェブサイト設定ファイルの、HTTPSプロトコル (ssl) で配信しているserverブロックの中に、Brotliに関する次のような設定を追加する# Brotli圧縮 brotli on; brotli_types text/plain text/css application/json application/javascript text/xml application/xml application/xml+rss text/javascript image/vnd.microsoft.icon; brotli_static on;
- Nginxの設定をテストしてエラーがないことを確認する
$ sudo nginx -t
nginx: the configuration file /etc/nginx/nginx.conf syntax is ok
nginx: configuration file /etc/nginx/nginx.conf test is successful
- Nginxの設定をreloadする
$ sudo systemctl reload nginx
Step-4. NginxがBrotli対応になっているか動作確認
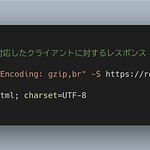
wgetコマンドなどを使って実際にウェブサーバへアクセスし、NginxがBrotli対応になっているかの動作確認を行う。
## gzipとbrに対応したクライアントに対するレスポンス
$ LANG=C wget --header="Accept-Encoding: gzip,br" -S https://remoteroom.jp/ 2>&1 | grep -E '  Content'
	Content-Type: text/html; charset=UTF-8
	Content-Length: 7943
	Content-Encoding: br

## gzipに対応したクライアントに対するレスポンス
$ LANG=C wget --header="Accept-Encoding: gzip" -S https://remoteroom.jp/ 2>&1 | grep -E '  Content'
	Content-Type: text/html; charset=UTF-8
	Content-Length: 9112
	Content-Encoding: gzip

## Accept-Encodingヘッダの値が無いクライアントに対するレスポンス
$ LANG=C wget --header="Accept-Encoding: " -S https://remoteroom.jp/ 2>&1 | grep -E '  Content'
	Content-Type: text/html; charset=UTF-8
	Content-Length: 55201
上記の結果から、Nginxが、クライアントのAccept-Encodingヘッダに応じて配信する圧縮形式を切り替えていることが確認できる。
なお、この例のhttps://remoteroom.jp/では、サイト更新の際に、HTMLファイルのindex.htmlとは別に、Gzip圧縮済みのindex.html.gzとBrotli圧縮済みのindex.html.brを同ディレクトリ内に自動保存している。そのためこの動作確認では、Nginxによる都度ファイル圧縮の状況ではなく、すでに存在する各圧縮形式の静的ファイルの配信 (gzip_static on;, brotli_static on;) の状況をテストしていることになる。
まとめ
今回の試みは、Ngnixの運用において、最新の機能を享受するためにUbuntuのデフォルト状態から抜け出した形だ。たとえばウェブサイトをCDNで配信しているなら、自らmoduleを用意したりはしないだろうが、それを試行錯誤してやってみるのもまた一興である。
Brotliの圧縮効果については、冒頭で確認したようにウェブ上のテキストファイルに関してはGzipよりも優れているようであり、テキスト割合高めの当ウェブサイトにはピッタリだ。閲覧者のブラウザがBrotli対応であれば、そのブラウジングがわずかながらでもよりさくさくになってくれることを期待したい。