Proxmox VEの仮想マシンイメージのクラウドバックアップをRcloneを使って実現する方法

バックアップを手堅く
1年ほど前、仮想化プラットフォーム (仮想化基盤) Proxmox VE (以下「PVE」) の環境構築について書きました。
このPVEの上で稼働している仮想マシンのイメージを、クラウドへバックアップしたくなったと想定します。PVEには様々な形式に対応したストレージ連携機能が標準で備わっていますが、たとえばGoogle Cloud Storageはその対応外です。
そこで、Rcloneというツールを使ってPVEサーバにGoogle Cloud Storageをマウントした上で、PVE上のVMイメージをクラウドバックアップする仕組みを実現してみました。PVEのVMイメージを遠隔地バックアップする一つの方法としてご紹介です。今回のPVEの環境は次の通り。
| 項目 | 内容 | 備考 |
|---|---|---|
| PVE OS | Debian GNU/Linux 11 (bullseye) | |
| PVE サーバ名 | proxmoxve | |
| PVE ユーザID | root | 一般ユーザ権限を常用している場合は下記手順のコマンドに適宜sudoを加えてください |
設定手順
Step-1. PVEサーバからGoogle Cloud StorageへアクセスできるようにRcloneを設定する
- 手元のPCにてターミナル画面を開いて、53682/tcpのローカルポート転送を効かせた
ssh -L 53682:localhost:53682 root@proxmoxveでPVEサーバに接続する (そのまま維持する) - PVEにrcloneをシェルでインストールする
- 詳細: Rclone > Rclone downloads > Script download and install https://rclone.org/downloads/#script-download-and-install
# sudo -v ; curl https://rclone.org/install.sh | sudo bash
(snip)
rclone v1.62.2 has successfully installed.
Now run "rclone config" for setup. Check https://rclone.org/docs/ for more details.
rclone configを実行してGoogle Cloud Storageと接続する (基本的にはdefault値を採用して進める)- VMイメージバックアップ専用のプロジェクトを事前にGoogle Cloudに作成しておくほうがわかりやすいし安全かもしれない
- 詳細: Rclone > Google Cloud Storage https://rclone.org/googlecloudstorage/
- 途中、「Project number」としてはProject IDを入力する (数字とは限らない)
- 途中、認証のために手元のPCで開くURLはこのようになる: http://127.0.0.1:53682/auth?state=... (ポート転送しているのでターミナル画面に表示されるURLをそのまま使用できる)
No remotes found, make a new one?
n) New remote
s) Set configuration password
q) Quit config
n/s/q> n

Enter name for new remote.
name> google-cloud-storage
〜〜〜〜〜〜〜〜〜〜
Option object_acl.
Access Control List for new objects.
Choose a number from below, or type in your own value.
Press Enter to leave empty.
   / Object owner gets OWNER access.
 1 | All Authenticated Users get READER access.
   \ (authenticatedRead)
   / Object owner gets OWNER access.
 2 | Project team owners get OWNER access.
   \ (bucketOwnerFullControl)
   / Object owner gets OWNER access.
 3 | Project team owners get READER access.
   \ (bucketOwnerRead)
   / Object owner gets OWNER access.
 4 | Default if left blank.
   \ (private)
   / Object owner gets OWNER access.
 5 | Project team members get access according to their roles.
   \ (projectPrivate)
   / Object owner gets OWNER access.
 6 | All Users get READER access.
   \ (publicRead)
object_acl> 4 # rclone default / 他からもアクセスする場合は4以外を検討すること
〜〜〜〜〜〜〜〜〜〜
Option bucket_acl.
Access Control List for new buckets.
Choose a number from below, or type in your own value.
Press Enter to leave empty.
   / Project team owners get OWNER access.
 1 | All Authenticated Users get READER access.
   \ (authenticatedRead)
   / Project team owners get OWNER access.
 2 | Default if left blank.
   \ (private)
 3 / Project team members get access according to their roles.
   \ (projectPrivate)
   / Project team owners get OWNER access.
 4 | All Users get READER access.
   \ (publicRead)
   / Project team owners get OWNER access.
 5 | All Users get WRITER access.
   \ (publicReadWrite)
bucket_acl> 2 # rclone default / 他からもアクセスする場合は2以外を検討すること
〜〜〜〜〜〜〜〜〜〜
Option location.
Location for the newly created buckets.
Choose a number from below, or type in your own value.
Press Enter to leave empty.
 1 / Empty for default location (US)
   \ ()
 2 / Multi-regional location for Asia
   \ (asia)
 3 / Multi-regional location for Europe
   \ (eu)
 4 / Multi-regional location for United States
   \ (us)
(snip)
location> ?? # https://cloud.google.com/storage/pricing での安いロケーションから例えばus-west1を選択
〜〜〜〜〜〜〜〜〜〜
Option storage_class.
The storage class to use when storing objects in Google Cloud Storage.
Choose a number from below, or type in your own string value.
Press Enter for the default (REGIONAL).
 1 / Default
   \ ()
 2 / Multi-regional storage class
   \ (MULTI_REGIONAL)
 3 / Regional storage class
   \ (REGIONAL)
 4 / Nearline storage class
   \ (NEARLINE)
 5 / Coldline storage class
   \ (COLDLINE)
 6 / Archive storage class
   \ (ARCHIVE)
 7 / Durable reduced availability storage class
   \ (DURABLE_REDUCED_AVAILABILITY)
storage_class> 4
rclone mkdir google-cloud-storage:/exampleを実行し、バケットexampleを作成する- バケットを作成する前にGoogle Cloudの当該プロジェクトでの「課金を有効」にしておく (請求先アカウントをリンクしておく) 必要がある
- Google Cloud Storageの管理画面にて、安全のため、作成したバケット
exampleの「アクセス権の編集」を実行して「公開アクセス: 非公開」とする- 具体的には、「公開アクセスの防止」をクリックして「このバケットへの公開アクセスを禁止しますか?」にて [確認] (Yes) をクリックする
rclone ls google-cloud-storage:/を実行して、バケットexampleが表示されることを確認する
Step-2. PVEサーバにrcloneコマンドでGoogle Cloud Storageをマウントする
- PVEサーバにて
mkdir /mnt/exampleでマウントポイントを作成する rclone mount -v google-cloud-storage:/example /mnt/exampleしてエラーが発生しないことを確認する (実行後数秒してエラーが発生しないならば正常とみなし、Ctrl+Cで終了する)Fatal error: failed to mount FUSE fs: fusermount: exec: "fusermount3": executable file not found in $PATHというエラーが出た場合は、apt install fuse3してから再度実行する
- daemonモードに切り替えて
rclone mount --daemon google-cloud-storage:/example /mnt/exampleした後、マウント状態をdf -h /mnt/exampleで確認する
# df -h /mnt/example
Filesystem                    Size  Used Avail Use% Mounted on
google-cloud-storage:example  1.0P     0  1.0P   0% /mnt/example
echo HELLO > /mnt/example/hello.txtした後、ls -al /mnt/example/hello.txtでファイルが一覧表示されることを確認するcat /mnt/example/hello.txtでファイル内容が表示されることを確認する
# cat /mnt/example/hello.txt
HELLO
rm /mnt/example/hello.txtでファイルが削除されることを確認するumount /mnt/exampleでマウントを解除する
Step-3. PVEサーバのmountコマンドからrcloneを呼び出す設定をする
which rclone mount.fuseで2つのプログラムのpathを確認する
# which rclone mount.fuse
/usr/bin/rclone
/usr/sbin/mount.fuse
- rcloneを、mount.fuseと同じpathにあるmount.rcloneとして呼び出すことができるように、
ln -s /usr/bin/rclone /usr/sbin/mount.rcloneする which mount.rcloneでmount.rcloneのpathを確認する
# which mount.rclone
/usr/sbin/mount.rclone
mount -t rclone google-cloud-storage:/example /mnt/example -o config=/root/.config/rclone/rclone.confした後、マウント状態をdf -h /mnt/exampleで確認するumount /mnt/example && rm -r /mnt/exampleでマウントの解除とマウントポイントの削除を実行する
Step-4. PVEサーバにGoogle Cloud Storageのフェイルセーフなautomountを設定する
PVEサーバが仮想マシンのイメージをバックアップする際に、インターネット経由で利用するクラウドストレージ (Google Cloud Storage) のマウントが外れている・途中で外れる事態を想定しておく必要があるのでは……と考えた。
何らかの事故でマウントが外れた状態だと、特になんの対策もしていない場合、数十GB規模のバックアップがマウントポイントを作成しているローカルストレージに直接保存されていき、当該領域を食いつぶす可能性があり、PVEインストール時のデフォルトでは /mnt は / (ルートパーティション) に属しているので、最悪の事態としてはバックアップ動作がProxmox VE自体の動作に影響するかもしれない。
このような事態を発生させないためには、マウントポイントを作成する領域をPVEから隔離すれば良いはず。この方針に基づき、今回はあらかじめ、クラウドストレージ用のマウントポイントを数十MBといった容量小さめのtmpfs (オンメモリ) の中に作成しておき、クラウドストレージのマウントが意図通り行えていない場合にはVMイメージのバックアップをわざと早々に失敗させる、フェイルセーフ機構を仕込むことにした。
- tmpfsを使うためのマウントポイントを
mkdir /mnt/tmpfsで作成する /etc/fstabに次の内容を追記する
# CUSTOM
tmpfs /mnt/tmpfs tmpfs defaults,size=64m 0 0
mount /mnt/tmpfsを実行した後、マウント状態をdf -h /mnt/tmpfsで確認する (/mnt/tmpfsはtmpfs (オンメモリ) に存在する最大容量64MBの領域だと分かる)
# df -h /mnt/tmpfs
Filesystem      Size  Used Avail Use% Mounted on
tmpfs            64M     0   64M   0% /mnt/tmpfs
- 「/mnt/tmpfsがオンメモリ領域ならばそこにマウントポイントを作成してGoogle Cloud Storageをマウントする」という意図である
df -t tmpfs /mnt/tmpfs >/dev/null && mkdir /mnt/tmpfs/Google-Cloud-Storage && mount -t rclone google-cloud-storage:/example /mnt/tmpfs/Google-Cloud-Storage -o allow_other,vfs_cache_mode=writes,config=/root/.config/rclone/rclone.confをワンライナーとして実行した後、2箇所のマウント状態をdf -h /mnt/tmpfs /mnt/tmpfs/Google-Cloud-Storageで確認する
# df -h /mnt/tmpfs /mnt/tmpfs/Google-Cloud-Storage
Filesystem                    Size  Used Avail Use% Mounted on
tmpfs                          64M     0   64M   0% /mnt/tmpfs
google-cloud-storage:example  1.0P     0  1.0P   0% /mnt/tmpfs/Google-Cloud-Storage
- ユーザrootのcrontabで次の内容が実行されるようにする (4のワンライナーをreboot時に実行する内容である)
# crontab -l
@reboot df -t tmpfs /mnt/tmpfs >/dev/null && mkdir /mnt/tmpfs/Google-Cloud-Storage && mount -t rclone google-cloud-storage:/example /mnt/tmpfs/Google-Cloud-Storage -o allow_other,vfs_cache_mode=writes,config=/root/.config/rclone/rclone.conf
- 可能であれば、PVEサーバを再起動して
/mnt/tmpfs/Google-Cloud-Storageがautomountされることを確認する
初めに述べた、クラウドストレージのマウントが意図通り行えていない場合のフェイルセーフ機構としては、次の点を考慮している。
- Linux起動時には
/etc/fstabが解釈された後にcronの「@reboot」が実行されるので、今回のautomountは意図通りの順で実行されるはず - もし仮に、「
mkdir /mnt/tmpfs/Google-Cloud-Storage」が失敗したらこのディレクトリは存在しないままであるため、本ディレクトリへのPVEによるバックアップ実行は自動的に失敗するはず - もし仮に、tmpfs領域での「
mkdir /mnt/tmpfs/Google-Cloud-Storage」は成功し、次の「mount -t rclone google-cloud-storage:/example /mnt/tmpfs/Google-Cloud-Storage ...」によるクラウド領域のマウントは失敗している場合、/mnt/tmpfs/Google-Cloud-Storageはクラウド領域ではなくtmpfs領域 (最大容量64MB) のままということになる。この場合、PVEによるバックアップ実行は容量不足を招いて自動的に失敗するはず
Step-5. PVEにGoogle Cloud Storageを使用するバックアップ設定を追加する
- PVEの管理画面にログインし、Datacenter > Storage > Add > Directory を選択し、次のような設定でストレージ領域として
/mnt/tmpfs/Googlg-Cloud-Storage/を追加する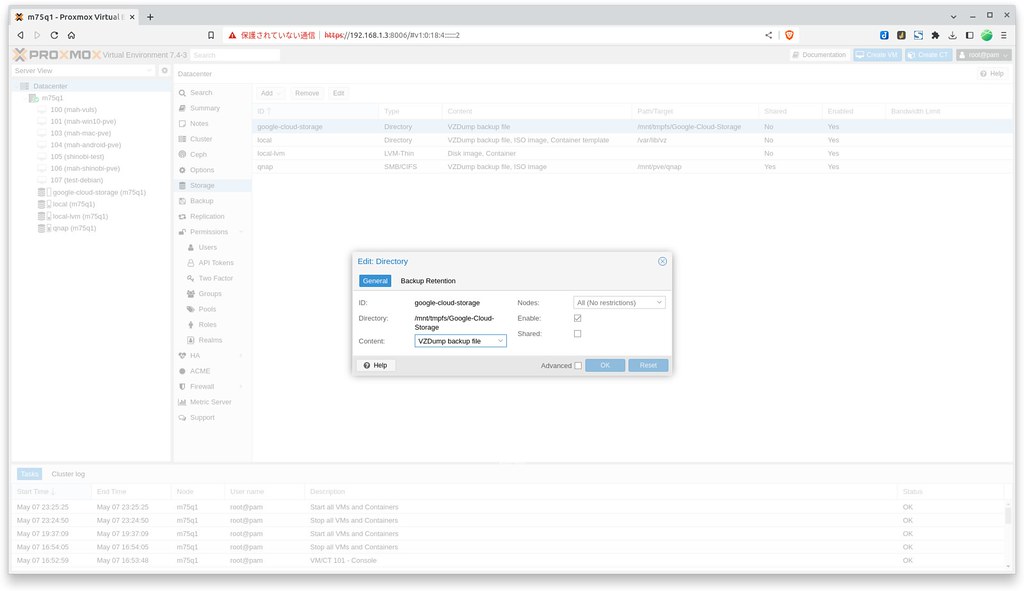
- Datacenter > Backup > Add を選択し、次のような設定で任意の仮想マシンのバックアップジョブを追加する
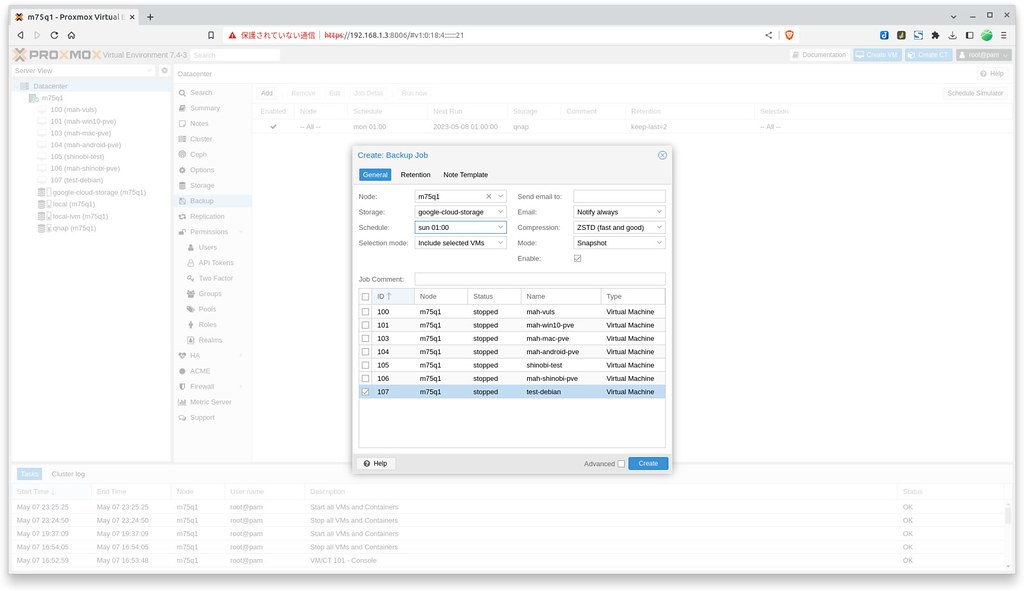
- 追加したバックアップジョブをまずは [Run now] で実行し、画面下部のTasksの当該行をダブルクリックして、バックアップが正常に完了したことを確認する
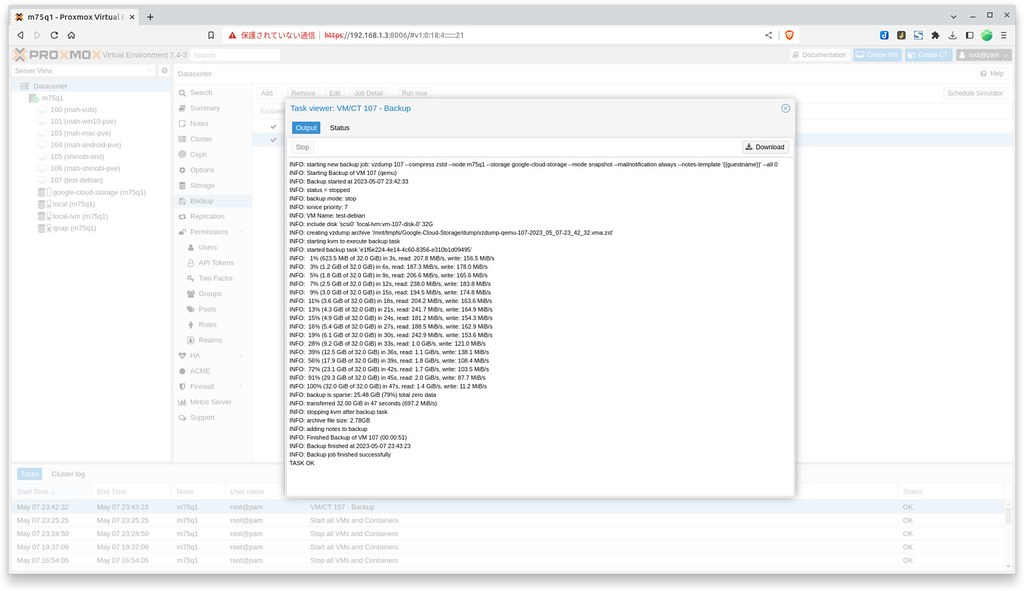
- PVEサーバの
/mnt/tmpfs/Google-Cloud-Storage/dump/(マウントしているGoogle Cloud Storage領域) にバックアップファイルが作成されていることを確認する
# ls -alh /mnt/tmpfs/Google-Cloud-Storage/dump/
total 2.8G
drwxr-xr-x 1 root root    0 May  7 23:34 .
drwxr-xr-x 1 root root    0 May  7 23:25 ..
-rw-r--r-- 1 root root 2.5K May  7 23:43 vzdump-qemu-107-2023_05_07-23_42_32.log
-rw-r--r-- 1 root root 2.8G May  7 23:43 vzdump-qemu-107-2023_05_07-23_42_32.vma.zst
-rw-r--r-- 1 root root   11 May  7 23:43 vzdump-qemu-107-2023_05_07-23_42_32.vma.zst.notes
- バックアップのテストは成功したとして、バックアップ本番時の領域使用量に関係する設定、具体的にはBackupのジョブごとのScheduleやRetention (バックアップの保持期間) や、Storageごとの設定にあるBackup Retentionを適切に設定する
感想
以上、オープンソースソフトウェアでかつ使い勝手の良い仮想化プラットフォーム「Proxmox VE」を活用していくための一つの情報です。ところどころ端折っているので、技術記事としては整っていない内容かもしれないと思う一方、私自身の勉強としては、Google Cloud Storage自体を今回の件で初めて使用し、フェイルセーフ機構を実現するためのtmpfsを使ったマウントポイントの工夫 (ベストかどうかは不明) を考えるのにもそれなりに頭をひねったので、このまま少しでも誰かの役に立てばいいや……という勢いで書きました。